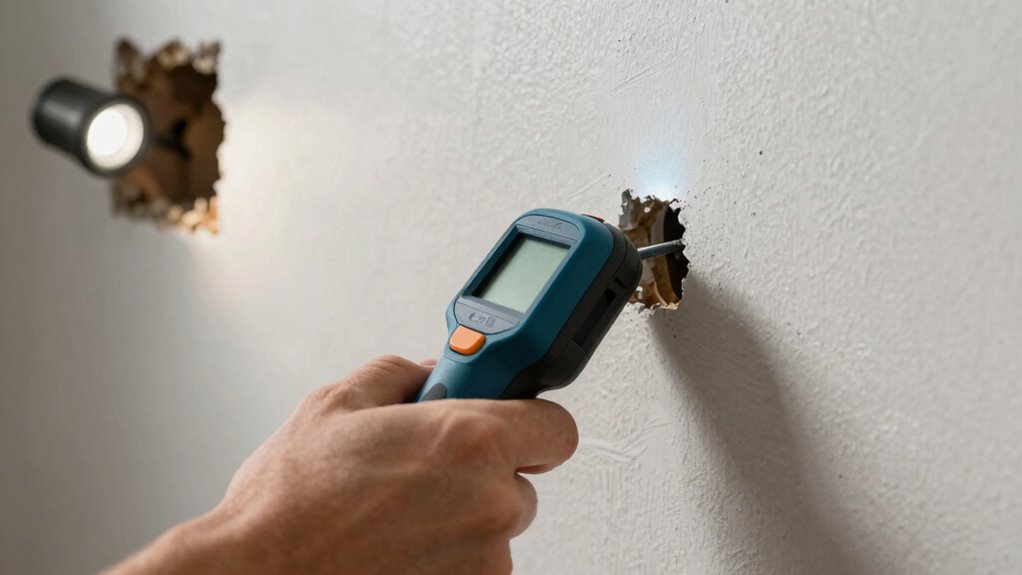

To find studs, pipes, and wires before drilling, use a quality stud finder to locate supports, marking each spot as you go. Verify the device’s calibration and move it slowly across the wall for accuracy. Look out for signs like outlets, switches, or discoloration that indicate wiring or plumbing behind the surface. Gently tap the wall to detect hollow areas and confirm no hazards remain. Keep these tips in mind for safer drilling—more helpful techniques await as you continue.
Key Takeaways
- Use a calibrated stud finder to locate studs accurately by sliding horizontally and marking detected signals.
- Turn off electrical power and use a circuit tester to identify and avoid live wires before drilling.
- Detect pipes by listening for hollow or solid sounds with a screwdriver tap and confirm with a pipe detector if available.
- Check for visual clues like outlets, switches, discoloration, or bulges that indicate the presence of wires or plumbing behind the wall.
- Drill small pilot holes carefully, applying gentle pressure, to verify the absence of studs, wires, or pipes before making larger holes.

Stud Finder Wall Scanner – 5 in 1 Stud Finder Tool w/Smart Chip and HD LCD Display, Stud Detector Beam Finders for the Center and Edge of Wood AC Wire Metal Studs Joist Pipe (Buttercup)
Accurate and Rapid: The wall stud finder adopts an intelligent micro-sensor chip with the highest sensitivity which can…
As an affiliate, we earn on qualifying purchases.
As an affiliate, we earn on qualifying purchases.
How to Safely Find Wall Studs, Pipes, and Wires Before Drilling
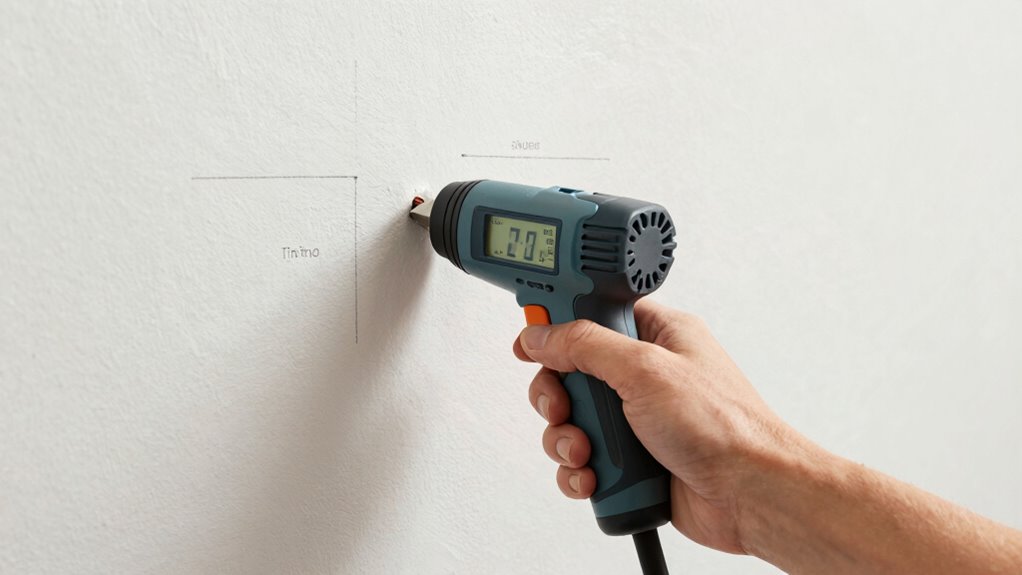
Before you start drilling into a wall, it’s vital to locate studs, pipes, and wires to avoid damaging them or causing injury. Protecting wall safety is a critical part of home improvement, ensuring your project proceeds smoothly and safely. Start by visual clues like outlets, switches, or baseboards, which often indicate the presence of studs or wires behind the wall. Use a reliable stud finder or other detection tools designed for wall safety to identify hidden supports and utilities. Always double-check your measurements before drilling to prevent hitting pipes or electrical lines. Additionally, understanding the contrast ratio of your projector can help you optimize your home cinema setup for better image quality. Incorporating knowledge about piercing care and hygiene can also inform you on how to handle unexpected injuries or irritation if your project involves cutting or drilling near sensitive areas. Being aware of proper detection techniques can significantly improve the accuracy of your findings and reduce the risk of errors. Employing advanced detection tools can further enhance the precision of locating hidden elements behind walls. Utilizing ethical considerations when working with electrical wiring or plumbing ensures compliance with safety standards and reduces hazards. Taking these precautions minimizes risks, prevents costly mistakes, and keeps your home improvement project safe and efficient. Remember, careful planning is key to safe and successful wall modifications.

NOYAFA NF-826 Underground Cable Locator Wire Tracker, for Dog Fence Cables Irrigation, Wall and Underground Pipeline Wire Detector, Advanced Circuit Breaker Finder for Wall and Underground Cables
Underground Wire Locator: Effortlessly locate buried cables and pipelines with NOYAFA NF-826 underground wire locator wire tracer range-Up…
As an affiliate, we earn on qualifying purchases.
As an affiliate, we earn on qualifying purchases.
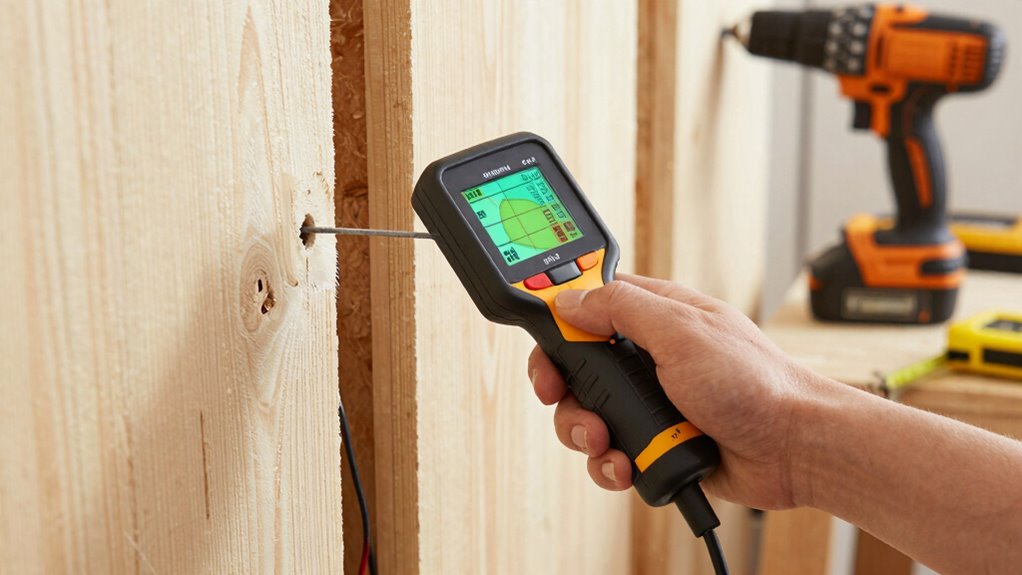
Using a Stud Finder to Locate Wall Supports With Confidence

Using a stud finder is one of the most effective ways to locate wall supports accurately and efficiently. Before you begin, verify your device is properly calibrated, following the manufacturer’s instructions, for reliable readings. Once calibrated, slide the stud finder horizontally across the wall, paying attention to the signals it gives. Stud finders detect different wall support types, such as wooden studs, metal supports, or concrete blocks, so understanding how your device interprets these signals is key. Keep your movements steady and slow for best results. When the finder indicates a support, mark the spot lightly with a pencil. This method provides confidence that you’re hitting solid wall supports, reducing the risk of drilling into pipes, wires, or weak spots. Additionally, understanding wall support detection techniques can help you adapt to various wall types for even better accuracy. Familiarizing yourself with the different wall support types can further improve your success rate when locating studs or pipes behind the wall. Being aware of wall composition and materials can also assist in interpreting the signals more accurately and avoiding surprises during drilling. Incorporating knowledge of essential oils for wall health and safety can even help in identifying areas with potential hazards, such as electrical wiring or plumbing, before drilling. For example, recognizing common wall construction methods can aid in predicting where supports are likely to be located.

PREXISO 2-in-1 Stud Finder with Laser Level, Rechargeable Multi Surface Cross Line Laser & Wall Stud Scanners Tool for Hanging Frames & Picture, Wood Ac Wire Metal Studs Joist Pipe Detection
TIPS: 1. Calibration is necessary before using the stud finder function. 2. Laser level is manual-leveling, not self-leveling,…
As an affiliate, we earn on qualifying purchases.
As an affiliate, we earn on qualifying purchases.
Detecting Electrical Wires and Plumbing Using Basic Tools
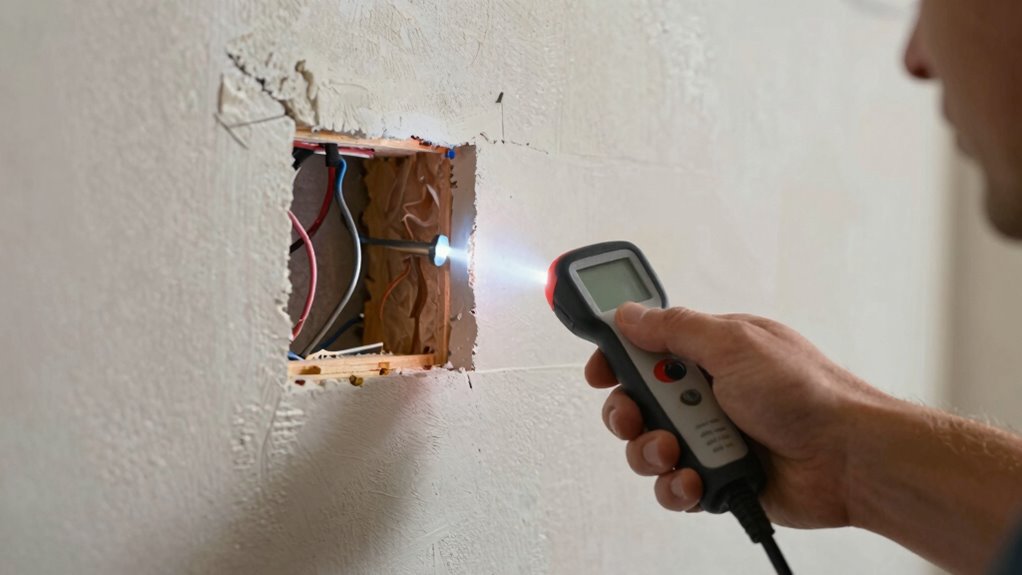
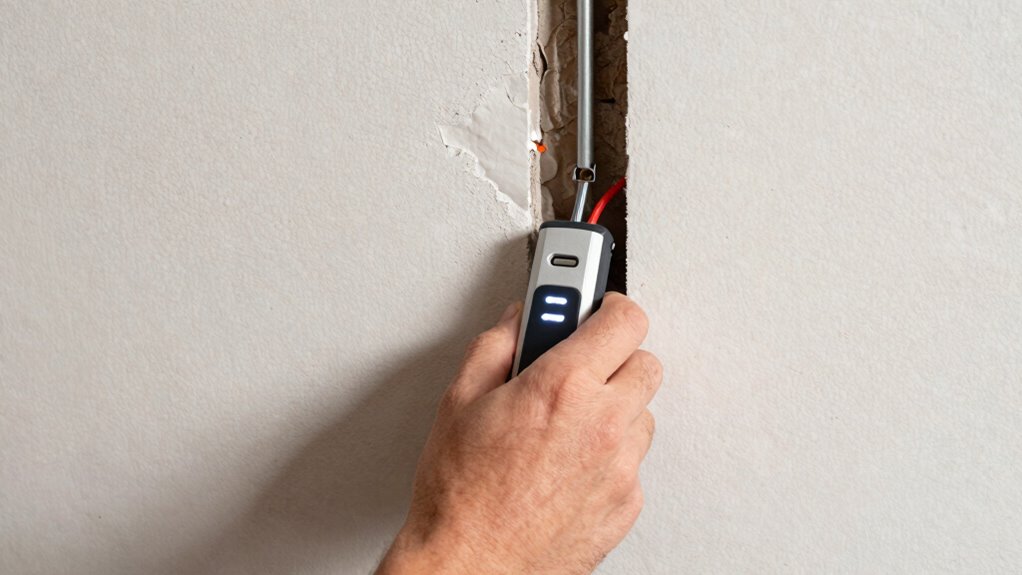
Detecting electrical wires and plumbing behind walls is essential to prevent accidents and damage during drilling. To do this with basic tools, start by turning off power at the breaker to ensure electrical safety. Next, look for clues like outlets, switches, or water fixtures indicating nearby wiring or pipes. Use a metal detector to identify metal pipes or wires within the wall. A simple circuit tester can help verify if wires are live before you drill. Additionally, gently tapping the wall with a screwdriver can reveal hollow spots or solid objects indicating pipes or wires. Visual signs like discoloration or bulges also help in plumbing detection. Conducting a wall inspection using multiple methods can further enhance your detection accuracy before making any holes. Employing detection tools properly is crucial for accurate results and safety. Remember to double-check with a non-contact voltage tester to confirm that no live wires are present in the area you plan to drill. Incorporating an understanding of building materials can also improve your confidence in identifying hidden utilities behind walls.

Automotive Circuit Tracer & Wire Tracker 6-42V DC Wire Short Finder, Circuit Tracker, Circuit Tester & Circuit Scanner for Car, Boat, Trailer – Open/Short Circuit Detection Tool EM415PRO
🔍 𝐀𝐜𝐜𝐮𝐫𝐚𝐭𝐞𝐥𝐲 𝐃𝐞𝐭𝐞𝐜𝐭𝐬 𝐒𝐡𝐨𝐫𝐭𝐬 𝐚𝐧𝐝 𝐎𝐩𝐞𝐧 𝐂𝐢𝐫𝐜𝐮𝐢𝐭𝐬: Easily locate broken or damaged wires, short circuits, and open connections…
As an affiliate, we earn on qualifying purchases.
As an affiliate, we earn on qualifying purchases.
Reading Wall Clues and Visual Signs to Spot Hidden Hazards
Noticing subtle clues on the wall surface can reveal hidden pipes, wires, or studs that aren’t immediately visible. Look for visual cues like slight bulges or indentations in wall textures, which may indicate the presence of pipes or studs behind the surface. Changes in wall texture—such as smoother patches or rough spots—can also serve as clues. Pay attention to areas where paint or wallpaper appears uneven or where seams seem misaligned. Shadows or reflections might hint at objects behind the wall. These visual signs can help you identify potential hazards before you drill, reducing the risk of damaging concealed utilities. Additionally, understanding wall surface patterns can improve your ability to recognize these hidden features more accurately. Using your knowledge of wall construction can make your detection more precise and safe. Recognizing how wall layers are assembled can further enhance your ability to identify concealed structures. Being familiar with building materials and their typical placement can also aid in spotting anomalies more effectively. Developing an eye for visual clues can significantly improve your detection skills and prevent costly mistakes. By honing your eye for wall textures and visual cues, you gain a safer, more effective way to locate hidden objects without relying solely on tools.
Tips for Safe Drilling After You’ve Identified Hidden Objects
Once you’ve identified the location of hidden pipes, wires, or studs, it’s essential to take precautions to prevent accidents during drilling. To guarantee drill safety and hazard prevention, follow these steps:
Identifying hazards before drilling ensures safety and prevents accidents.
- Use the correct drill bit suited for your wall material to avoid slips.
- Mark the safe zone clearly around the identified object to stay precise.
- Apply gentle pressure and let the drill do the work, reducing the risk of hitting hidden hazards.
- Start with a small pilot hole to check for any unexpected obstructions before enlarging it.
Frequently Asked Questions
Can I Use a Smartphone App to Detect Studs or Wires?
Yes, you can use a smartphone app to detect studs or wires. These apps utilize your phone’s sensors for wall detection, helping you identify where studs, pipes, or wires might be concealed. Keep in mind, though, that smartphone sensors aren’t as precise as dedicated tools. Use the app as a preliminary guide, but always confirm with a stud finder or other detection device before drilling to verify safety.
How Accurate Are Manual Methods Compared to Electronic Detectors?
Manual methods are charmingly unreliable, like trying to find hidden treasure with a stick and a hunch. Electronic detectors, on the other hand, are like having a metal-detecting superhero at your side. They’re markedly more accurate, catching studs, pipes, and wires with precision. So, if you want to avoid surprises and avoid turning your wall into Swiss cheese, trust electronic detectors over manual methods—they’re your best bet for safe, accurate drilling.
What Are the Risks of Drilling Without Proper Detection?
Drilling without proper detection risks wall damage and electrical shock. You might accidentally hit hidden wires or pipes, causing costly repairs or dangerous shocks. Without accurate detection, you also risk weakening the wall’s structure, leading to future issues. Always use reliable tools or methods to locate studs, pipes, and wires, ensuring your safety and preventing damage. Taking these precautions saves time, money, and your well-being.
How Can I Differentiate Between Different Types of Pipes Behind Walls?
You can differentiate between types of pipes behind walls by inspecting pipe material and wall thickness. Metal pipes like copper are often thick and conductive, while plastic pipes are smoother and thinner. Use a pipe detector or a moisture meter to identify material and locate the pipe’s edges, then compare wall thickness from the detector’s readings. Knowing these details helps you drill safely without damaging pipes or causing leaks.
Are There Specific Safety Precautions for Older Homes With Hidden Hazards?
In older homes, prioritize a thorough hazard assessment before drilling, as hidden hazards may threaten your safety and the home’s structural integrity. Wear protective gear, turn off utilities, and use a stud finder with advanced sensors to detect pipes and wires. Consider consulting a professional for a detailed inspection, especially if you suspect asbestos or outdated wiring. Taking these precautions helps prevent accidents and guarantees your project proceeds safely.
Conclusion
By taking the time to identify studs, pipes, and wires before drilling, you not only protect yourself and your home but also avoid unexpected surprises. Sometimes, a simple glance or a quick tool test reveals more than you’d expect—like discovering a hidden wire just where you thought it was safe. When you approach each project with caution and awareness, you’ll find that safe drilling becomes almost second nature—like a lucky coincidence that keeps everything running smoothly.